Hosting Gratis

Redirect Halaman Registrasi Joomla


http://anbu-files.blogspot.com - Redirect Halaman Registrasi Joomla - To redirect user to a message page after registration, do the following.


In "Joomla/components/com_user/controller.php" replace line 288 with this:

$this->setRedirect('index.php?option=com_content&view=article&id=96', $message);

NOTE: You will have to replace the "id=96" with the ID of your article which can be see in the article manager chart.


In the "index.php" of your template add this after the line with "<jdoc:include type="component"/>":

<?php if ($this->getBuffer('message')) : ?>
<div class="registration_accepted">
<p><jdoc:include type="message" /></p>
</div>
<?php endif; ?>


In your CSS use the "registration_accepted" class to format the div.


In the Joomla back end, create an article "Registration Accepted!" and in HTML editing mode insert:

<jdoc:include type="message" />

Also switch off all details like "author", "created date".

That's it!
advertisment

Mengatasi Error Session pada website Joomla


anbu-files.blogspot.com - Mengatasi Error Session pada website Joomla - Artikel ini akan menjelaskan cara mengatasi error session.php yang terjadi pada website Joomla.


Masalah terjadi ketika membuka website yang dibuat dengan Joomla dan menemukan error yang mirip dengan yang dibawah ini:

Warning: ini_set() has been disabled for security reasons in /home/xxx/public_html/libraries/joomla/session/session.php on line 102
Warning: ini_set() has been disabled for security reasons in /home/xxx/public_html/libraries/joomla/session/session.php on line 105
Warning: ini_set() has been disabled for security reasons in /home/xxx/public_html/libraries/joomla/session/session.php on line 682
Lakukan hal-hal berikut untuk mengatasinya:
  1. Gunakan File Manager untuk menemukan lokasi file yang disebutkan di pesan error, yaitu/public_html/libraries/joomla/session/session.php. Backup atau copy file tersebut ke komputer dan simpan di tempat yang aman untuk jaga-jaga.
  2. Buka file session.php di File Manager dengan Edit, lalu lakukan pencarian kata ini_set. Gunakan CTRL + F di browser untuk melakukan pencarian.
  3. Tambahkan @ di depan setiap ini_set yang ditemukan sehingga tulisannya menjadi @ini_set.
  4. Save file session.php yang telah di-edit, dan buka website anda. Apabila masih error mengenai ini_set berarti ada ini_set yang terlewatkan dan perlu ditambahkan @ di depannya.
Thanks for the solutions
source : http://www.idebagus.com/help/panduan/hosting/mengatasi-error-session-pada-website-joomla
advertisment

Setting VirtueMart Setelah Migrasi Hosting

Setting VirtueMart Setelah Migrasi Hosting

http://anbu-files.blogspot.com - Setting VirtueMart Setelah Migrasi Hosting - untuk rekan-rekan blogger yang suka dengan virtumart pasti kadang-kadang mengalami kesulitan seperti ini :) , yaitu link virtumart tidak masuk ke domain yang kita miliki setelah pemindahan dari Host lain atau dari localhost ke online.
berikut beberapa langkah yang bisa rekan-rekan coba untuk Setting VirtueMart Setelah Migrasi Hosting :


Set VirtueMart dari SKRIP

  1. Login ke control panel hosting Anda (Spanel/cPanel)
  2. Masuk ke direktori root Anda (folder www untuk sPanel dan folder public_html untuk cpanel)
  3. Masuk ke direktori administrator/components/com_virtuemart/ dan edit file virtuemart.cfg.php
  4. Rubah bagian di bawah ini
 // these path and url definitions here are based on the Joomla! Configuration
 define( 'URL', 'http://localhost/namafolder/' );
 define( 'SECUREURL', 'http://localhost/namafolder/' );
menjadi
 // these path and url definitions here are based on the Joomla! Configuration
 define( 'URL', 'http://tokoku.com/' );
 define( 'SECUREURL', 'http://tokoku.com' );
  • Jangan lupa Klik tombol Save untuk menyimpan perubahan

Set VirtueMart dari Backend Joomla

Jika Anda tidak begitu paham dengan skrip, bisa via Backend Joomla Anda. Caranya:
  1. Login ke Backend Joomla
  2. Arahkan Mouse ke menu Component dan pilih VirtueMart
  3. Klik menu Configuration di sebelah kiri dan klik tab Security di sebelah kanan.
  4. Rubah Site URL dan SECUREURL menjadi nama domain Anda. Contoh: http://tokoku.com
  5. Simpan untuk merubah.

nah semoga tips Setting VirtueMart Setelah Migrasi Hosting dapat bermanfaat bagi rekan-rekan

advertisment

Cara Memperbaiki JFolder create: Could not create directory Warning! Failed to move


anbu-files.blogspot.com - Cara Memperbaiki JFolder create: Could not create directory Warning! Failed to move - berikut ini adalah tips untuk Memperbaiki JFolder create: Could not create directory Warning! Failed to move. pelajaran ini saya dapat setelah mengalami eror JFolder create: Could not create directory Warning! Failed to movePasti rekan-rekan juga pernah mengalami hal serupa yaitu JFolder create: Could not create directory Warning! Failed to move pada saat menginstall Component, plugin maupun module pada joomla. Hal ini biasanya terjadi saat kita melakukan perpindahan hosting atau pemindahan website. Tentunya akan sangat Menyebalkan dan Merepotkan jika kita tidak dapat menginstall Componen, MOdul atau Plugin di Install extensions joomla. Hal ini disebabkan oleh ketidak cocokan path hosting dengan settingan yang ada pada configuration.php joomla kita.

nah berikut ini alah sedikit Tips Cara Memperbaiki JFolder create: Could not create directory Warning! Failed to move :

langsung saja anda buka file Configurstion.php di host anda dan pastikan path yang anda ketikan sama dengan path di host baru anda.

Edit file configuration.php dengan menggunakan Code Editor yang tersedia di hosting anda

lihat path website anda pada panel sebelah kiri File Manager, tampilan sebagai berikut

Posted Image

perhatikan path mtsnmode itu merupakan path web kita tentunya hosting anda pastinya berbeda sesuai dengan website anda dan samakan dengan yang ada pada file configuration.php yang tadi dibuka. lihat gambar dibawah ini

Posted Image

Jika sudah disamakan jangan lupa klik save, sekarang coba kembali menginstall component atau extensions joomla anda.

nah itu adalah Cara Memperbaiki JFolder create: Could not create directory Warning! Failed to move
semoga berhasil

Source: http://komunitasseo.com/topic/523-memperbaiki-jfolder-create-could-not-create-directory-warning-failed-to-move/
advertisment

Kode-kode mouse over html

anbu-files.blogspot.com - Kode-kode mouse over html - berikut ini adalah contoh kode-kode html untuk efek mouse over :

<p style="text-align: center;"><a href="platinum-forum.html"><img src="images/stories/demo/platinum_forum.png" border="0" onmouseover="this.src='images/stories/demo/platinum_forum_white.jpg';" onmouseout="this.src='images/stories/demo/platinum_forum.png';" style="border: 0pt none;" /></a></p>


<p style="text-align: center;"><a href="index.php?option=com_content&amp;view=article&amp;id=49&amp;Itemid=56"><img src="images/stories/menu1.jpg" onmouseover="this.src='images/stories/hover-facial.jpg';" onmouseout="this.src='images/stories/menu1.jpg';" style="border: 0pt none;" border="0" /></a>
</p>
<p style="text-align: center;"><a href="index.php?option=com_content&amp;view=article&amp;id=50&amp;Itemid=57"><img src="images/stories/menu2.jpg" onmouseover="this.src='images/stories/hover-facial.jpg';" onmouseout="this.src='images/stories/menu2.jpg';" style="border: 0pt none;" border="0" /></a>
</p>
<p style="text-align: center;"><a href="index.php?option=com_content&amp;view=article&amp;id=51&amp;Itemid=58"><img src="images/stories/menu3.jpg" onmouseover="this.src='images/stories/hover-facial.jpg';" onmouseout="this.src='images/stories/menu3.jpg';" style="border: 0pt none;" border="0" /></a>
</p>


<p style="text-align: center;"><a href="/index.php?option=com_content&amp;view=category&amp;layout=blog&amp;id=34&amp;Itemid=56"><img src="/images/stories/catering.jpg" border="0" width="420" height="111" onmouseover="this.style.opacity=0.4;this.filters.alpha.opacity=40" onmouseout="this.style.opacity=1;this.filters.alpha.opacity=100" style="opacity:1;filter:alpha(opacity=100)" /></a> <a href="/index.php?option=com_content&amp;view=category&amp;layout=blog&amp;id=35&amp;Itemid=56"><img src="/images/stories/wedding.jpg" border="0" width="421" height="111" onmouseover="this.style.opacity=0.4;this.filters.alpha.opacity=40" onmouseout="this.style.opacity=1;this.filters.alpha.opacity=100" style="opacity:1;filter:alpha(opacity=100)" /></a></p>


advertisment

membuat custom halaman eror 404 Joomla 2.5


membuat custom halaman eror 404 Joomla 2.5

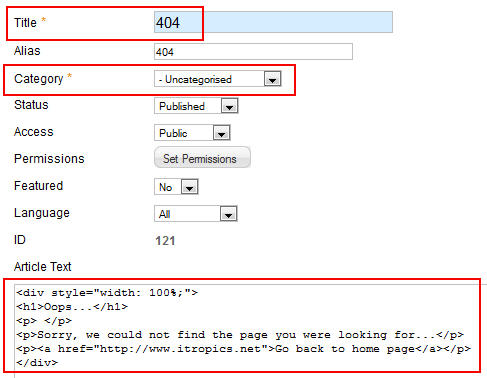
  1. On your Joomla 2.5 control panel, add New Article with a 404 title under Uncategorised category.
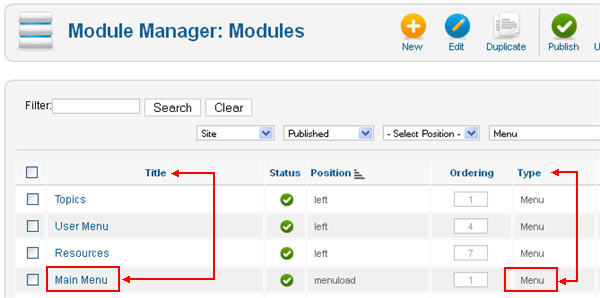
  2. Add New Menu Item with a 404 Error Page title then link your new article but make the Status Unpublished.
    Click Save & Close.
  3. Edit the newly created menu item 404 Error Page. Copy the Link content (e.g. index.php?option=com_content&view=article&id=121).
  4. Go to your joomla folder and copy error.php from templates/system/ folder to your default template folder (e.g.templates/itropicstemplate/).
  5. Open the newly copied error.php and add this line after the defined('_JEXEC') or die; line.
    if (($this->error->getCode()) == '404') {
    header('Location: index.php?option=com_content&view=article&id=121');
    exit;
    }
    So, your error.php file should look like this.
  6. Replace index.php?option=com_content&view=article&id=121 with your link content as per step # 3.
  7. Visit your website and navigate to a non-existing page to test your custom 404 error page.

ALTERNATIVE WAY

  1. On your default template folder (e.g. templates/itropicstemplate), duplicate your index.php and rename it toerror.php
  2. Open your error.php file and add the title line on your head part.
    <head>
    ....
    <title><?php echo $this->error->getCode(); ?> - <?php echo $this->title; ?></title>
    ....
    </head>
  3. Add the jimport line after the line <body>. So it will look similar to this:
    <body>
    <?php jimport( 'joomla.application.module.helper' ); ?>
    ...
    ...
    </body>
  4. On your main content where you normally place the syntax <jdoc:include type="component" />, replace that with your 404 error message like the one below.
    <div style="width:100%;">
       <h2>Oops...</h2>
      <p>Sorry, we could not find the page you were looking for...</p>
      <p>&nbsp;</p>
      <p><a href="http://www.itropics.net">Go back to home page</a></p>
    </div>
  5. Now your menu and other modules will not show up on your 404 Error page. In this case, we need to use theJModuleHelper::getModulesyntax.

    Let say, I want to show the menu module.

    Change:
    <jdoc:include type="modules" name="menu" />
    To:
    <?php $module = JModuleHelper::getModule( 'menu' , 'Main Menu' );
    $attribs['style'] = 'xhtml';
    echo JModuleHelper::renderModule( $module, $attribs);    ?>


    getModule syntax is getModule( $name, $title ). More info about getModule can be found onhttp://docs.joomla.org/JModuleHelper/getModule.

    If you want to display a Custom HTML module, $name is custom and $title is your title, so mine would be Footer - Column 1, like:
    <?php
    $module = JModuleHelper::getModule( 'custom' , 'Footer - Column 1' );
    echo JModuleHelper::renderModule( $module);
    ?>

    If you want to display the DisplayNews module, $name is dn.
    If you want to display the Search module$name is search.

    membuat custom halaman eror 404 Joomla 2.5


advertisment

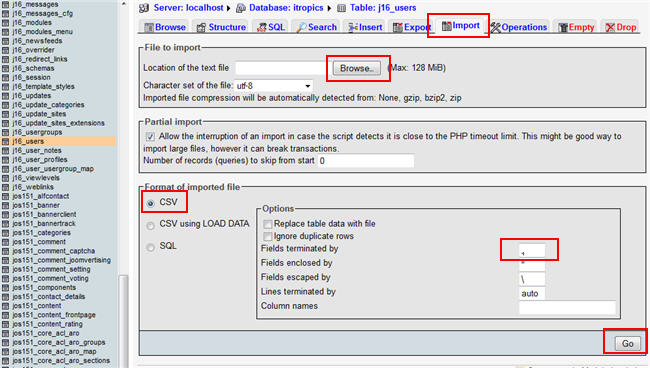
Export user joomla 1.5 to joomla j 2.5


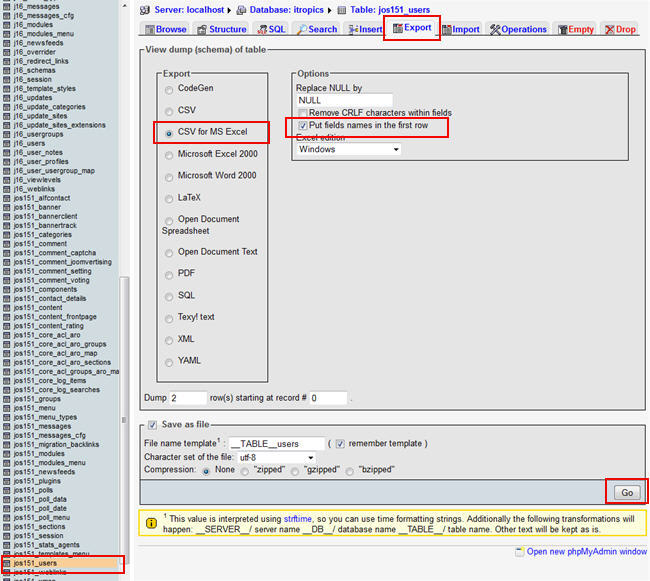
  1. Login to your phpMyAdmin, export the Joomla 1.5 _users table as CSV for MS Excelwith tick on Put fields names in the first row
  2. Open the exported file with MS Excel.
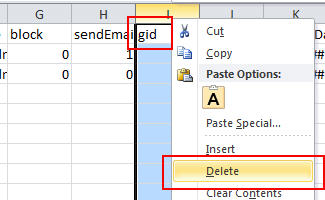
  3. Delete the gid column and save the file as CSV.
  4. Go back to phpMyAdmin, select the Joomla 2.5 _users table.
  5. Click Import, select Format as CSV, change Fields terminated by with comma (,) instead of semi-colon (;) to avoid the error while importing "Invalid field count in csv input on line 1"
  6. Click the Browse link and check the imported data.
advertisment

Cara Mecegah Copy Paste Pada Blog

Setelah sekian lama tidak posting dikarenakan masih banyak urusan yang harus saya selesaikan, dan kali ini saya hanya sedikit share dari postingan blog sahabat yaitu tentang cara mencegah copy paste pada blog, kalau menurut saya sih hal ini tidak terlalu penting, merupakan satu keuntungan tersendiri bila artikel kita di copas (copy paste), apa lagi bila sobat yang copas mau mencantumkan sumber dari artikel tersebut, bisa menambah back link kan, merupakan keuntungan tersendirikan.

Namun bagi sobat yang merasa bahwa artikel sobat sangat penting dan tidak rela untuk di copy paste, mungkin hal ini cukup berguna untuk dilakukan. akan tetapi cara tersebut tidak melindungi content blog sobat sepenuhnya, stidaknya cukup membuat orang yang berniat copas sedikit bingung apabila dia seorang newbie, karena sebenarnya ada jalan lain untuk bisa meng-copas artikel blog sekalipun sudah dilindungi dengan script anti copas.

Tanpa panjang lebar, kali ini untuk melindungi blog di blogger (blogspot) dari dari copy paste adalah dengan mendisable right click, atau lebih dikenal dengan mematikan klik kanan. Berikut tutorial cara mematikan klik kanan pada blogspot.

  • Login terlebih dahulu ke Blogger.com
  • Dari halaman Dashboard, silahkan Sobat menuju ke Tata Letak > Edit HTML
  • Lalu cari kode <body> atau <body (dengan bantuan tekan Ctrl+F atau F3)
  • Tambahkan kode dibawah ini ke dalam kode <body> atau <body tadi, atau bisa juga di ganti sekalian

<body oncontextmenu='return false' onmousedown='return false' onselectstart='return false' onkeypress='return false'>

Sobat juga bisa menggunakan beberapa tambahan kode saja, atau semuanya juga boleh, terserah kebutuhan anda.

Berikut penjelasan dari kode-kode diatas:

oncontextmenu='return false' (untuk mematikan klik kanan mouse)
onmousedown='return false' (untuk mematikan klik blok ke bawah)
onselectstart='return false' (untuk mematikan seleksi blok)
onkeypress='return false' (untuk mematikan tombol keyboard)


Jika sudah, Simpan Template blog Sobat.

Mohon maaf apabila tutorial sebelumnya tidak berhasil karena belum saya coba. untuk demonya silakan sobat lihat di sini DEMO.

Selamat mencoba dan semoga berhasil sobat.
Sumber: http://www.nova13.com
advertisment

Cara Memasang Buku Tamu / CBOX Di Blog Muncul Dari Berbagai Arah

Cbox atau lebih dikenal sebagai buku tamu merupakan hal yang tidak asing lagi di dunia blogger, sudah banyak tutorial-tutorial yang membahas tentang cara pemasangan Cbox, baik dengan cara standar maupun dengan cara pengubahan kode CSS.

Kali ini saya akan memposting cara memasang Cbox  auto hiden dari segala arah, segala arah maksudnya yaitu Cbox dapat ditempatkan atau muncul dari bagian sebelah kiri blog, kanan blog, bawah blog, dan atas blog, dan disertakan juga animasi gambar gif sebagai background.

Saya kira cukup sekian bla bla bla penerangan saya, dan mari kita menuju kepokok pembahasan.

Berikut ini adalah Cara Memasang Buku Tamu / CBOX Di Blog Muncul Dari Berbagai Arah:
  1. Seperti biasa sobat harus Login dulu di akun blog sobat
  2. Pilih Tata Letak
  3. Tambah Gadget HTML/Java Script
  4. Selanjutnya copy paste kode script di bawah ini dan masukan ke dalam Gadget HTML/Java Script.

Klik show untuk melihat
<style type="text/css">
#at{
position:fixed;
right:35%;
z-index:+1000;
}
* html #at{position:relative;}
.attab{
height:0px;
width:0px;
float:top;
cursor:pointer;
background:url(url);
}
.atcontent{
float:left;
border:2px solid #fff;
background:url(https://blogger.googleusercontent.com/img/b/R29vZ2xl/AVvXsEjjZ3_f5cerpkAl8KfQpokKTxSbo002KknFHWtDo14KzN2IvvOEIFgC8HSjdwah39Mk6Tf_W7yldt_9Ai-QUhj4K-qiq4VFVtumQK3FzC3YkVT00XHQhW-gSSLAjUSJ2p3jR0zfPO5LTOop/)#000000 repeat-x bottom center scroll;
-moz-border-radius:10px;
padding:10px;
}
.atcontent:hover{
border:2px solid #fff;
background:url(http://petir-project.googlecode.com/files/zuaz-petir.gif)#000000 repeat-x bottom center scroll;
}
</style>
<script type="text/javascript">
function showHideAT(){
var at = document.getElementById("at");
var w = at.offsetWidth;
at.opened ? moveAT(0, -200-w) : moveAT(20-w, 0);
at.opened = !at.opened;
}
function moveAT(x0, xf){
var at = document.getElementById("at");
var dx = Math.abs(x0-xf) > 25 ? 35 : 1;
var dir = xf>x0 ? 1 : -1;
var x = x0 + dx * dir;
at.style.bottom = x.toString() + "px";
if(x0!=xf){setTimeout("moveAT("+x+", "+xf+")", 10);}
}
</script>
<div id="at">
<div class="attab" onclick="showHideAT()"> </div>
<div class="atcontent">
<div align="center">
<div style="background:url(http://i53.tinypic.com/oiu4n9.gif) no-repeat;">

Strip kode cbox sobat

</div>
</div>
<br />
<div align="right"><a href="javascript:void(0);" onclick="showHideAT()"><img border="0" src="http://i859.photobucket.com/albums/ab159/yudhizh/ButtonCloseWhite-BlackStroke.png" alt="close" title="Tutup Cbox" /></a></div>
</div></div>

<script type="text/javascript">
var at = document.getElementById("at");
at.style.bottom = (-200-at.offsetWidth).toString() + "px";
</script>

Klik save / simpan.

Keterangan:
  1. Kode warna merah adalah warna gambar, silakan sobat sesuaikan sendiri sesuai selera bila ingin mengganti gambarnya
  2. Kode warna kuning adalah penepatan dimana cbox akan muncul, bila sobat ingin cbox muncul dari atas ganti kode tersebut menjadi TOP, dari sebelah kiri LEFT, dari sebelah kanan RIGHT .
  3. Kode warna putih adalah jarak cbox dari sebelah kanan. Silakan sobat sesuaikan sendiri.
  4. Texts berwarna hijau adala tempat untuk menaruh strip kode cbox sobat (atur cbox sobat agar backgroudnya transparant untuk hasil yang lebih sempurna).
Selanjutnya adalah cara membuat tombol cbox (tombol untuk menampilkan cbox)

  1. Tetap login di akun blog sobat
  2. Masukan script berikut bersamaan dengan script di atas dalam gadget HTML / Java Script
<div style="position: fixed; top: 55px; right: 5px;width:30px;height:100px;"><a href="javascript:void(0);"onclick="showHideAT()"/><img src="http://lh4.ggpht.com/_1j80TgNqd_8/TS3MlHxaygI/AAAAAAAABVo/P36anu_ToeA/s128/guestbook.png" alt="cbox" title="Buka Chat Book"/></a></div>

Keterangan: 
  • Kode berwarna merah adalah gambar tombol, bisa sobat ubah sesuai selera.
  • Kode warna kuning adalah dimana tombol akan ditempatkan, TOP untuk menempatkan tombol di atas, BOTTOM untuk menempatkan tombol di bawah, LEFT untuk menempatkan tombol di sebelah kanan.
  • Kode warna biru anda sesuaikan jarak tombol TOP dari atas blog, BOTOM dari bawah blog.
Demikianlah Cara Memasang Buku Tamu / CBOX Di Blog Muncul Dari Berbagai Arah. Semoga bermanfaat bagi sobat semua.

Sumber Script: Zuaz'Z Creator
advertisment
Diberdayakan oleh Blogger.
 
Copyright © 2013. Joomla Tutorial, Blogger Tutorial, Wordpress Tutorial, Info and Trick Adsense - All Rights Reserved
Berita Unik dan Update BING 2013 | Template by SHARE4RT | Proudly powered by Blogger